Spring Gardening Checklist
So you’ve created your garden plan (I hope!) and it’s time to prepare your garden for planting. Here’s a list of items TO DO and the tools you may need to get the job done.
1. Remove anything used to “winterize” your garden.
You may or may not have covered your gardens, or done something else to help them endure the winter weather. Take everything down and store it away.
2. Turn the soil
If you live in an area that gets a lot of snow or rain, it’s likely all that water has compacted your garden soil. Use a spading fork to turn the soil, break up any clods and “fluff” it. Even out the soil with a rake or with your hands–the soil level should be higher than when you started.
| Spading Fork | Rake | Gloves |
Note about the tools:
You can probably purchase many of these items for less money at Home Depot or Wal-Mart. I am offering pictures and links to Amazon for those who find it more convenient to order online. I tried to find the least expensive items that still had good ratings, and whenever possible I looked for free shipping.
Spading Fork
I have found the spading fork is an essential tool for preparing my garden in the spring, and I use it for managing my compost. It is like a short-handled pitch fork. The short handle makes me bend a lot, and my back is tired after I use it. However, I’ve looked all around and not found a suitable replacement.
Rake
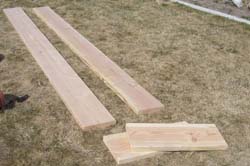
If you don’t already have a rake, just use your hands and arms! Or maybe take a 2×4 board and even out the soil.
Gloves
This is just a sample of a decent pair of gardening gloves–I have tried many and found that you get what you pay for. The cheap $1 pair are fine for planting and transplanting, but they won’t protect you from blisters when doing this kind of work with the spading fork. I like gloves that have velcro, so you can tighten them around the wrist and keep dirt from getting in.
I do own some of the kind that have a rubber coating on the palms, and I love them for pulling grass around my garden beds. But it doesn’t take long before they get hot and sweaty, so they are not my glove of choice.
Another note–I made the mistake of buying a set of 4 or 5 at Costco, and I can hardly stand them because the seams on the inside rub against my fingers. They look like nicer gloves, but are cheaply made.
3. Amend the Soil
“Amend the soil” is a fancy way to say “add stuff.” What do you need to add? Compost, fertilizer, possibly peat moss, vermiculite, or other amendments.
Compost
Try to add as many types of compost as you can find, including:
- Homemade (created using your yard waste and green kitchen scraps)
- Chicken manure compost
- Turkey manure compost (locally called Nutrimulch)
- Mushroom compost (includes a variety of sources)
- Cow, sheep, or goat manure that has been composted
- Any other compost mix available locally. For example, I buy Harvest Supreme.
- AVOID USING STEER MANURE–they feed the steer with a lot of salt to fatten them up, and the salt is bad for your garden
You want to fill your garden beds full to the top, since the soil will settle and compact throughout the season. I would estimate that I add 2-3 cubic feet of compost for every 4×4 garden box (12″ high). I always prepare about half my beds at one time (I have seven), and after doing the first half I know pretty accurately how much to buy for the second half.
Fertilizer
Unless you have had fabulous, fantastic yields from your square foot or raised garden beds, I suggest adding a complete fertilizer before planting. Ideal is 16-16-8 mixed with Ironite, apply 1/3 cup per 4×4 garden bed and mix it thoroughly into the top 6-9 inches of soil. This is a fast-release, granular fertilizer. Read more about fertilizer if you have questions.
I am still looking for some good, widely-available options for fertilizer, preferably something you can purchase online. I’ll update this if/when I find it!
Vermiculite
If your soil sticks together in big clumps and clods when you turn it over, and seems heavy and moist, I suggest you add some vermiculite. This will lighten the soil, trapping both air and water in the gaps it creates. Read more about vermiculite and where to buy it here.
Peat Moss
If your soil does not retain moisture well, and always seems very dry you may want to add peat moss. It traps the water, and makes the soil heavier. It is usually available at most home and garden stores (Wal-Mart, Home Depot), as well as nurseries and farm coops.
Other Amendments
Unless you are having problems with your soil–a particular vegetable is not growing well, or perhaps NOTHING grows well, you don’t need to add anything else to it. But if you are struggling, the first thing to do is test your soil. I suggest purchasing a home test kit![]() –they are inexpensive, and might provide all the information you need. If this doesn’t help, you may want to pay to have your soil tested professionally. This is usually available through your local extension office (www.extension.org).
–they are inexpensive, and might provide all the information you need. If this doesn’t help, you may want to pay to have your soil tested professionally. This is usually available through your local extension office (www.extension.org).
4. Set up plant supports
Some vegetables do better with the option to grow up instead of out. If you use plant supports be sure to purchase “refills” for items that may have weathered and need to be replaced.
| Baboo Stakes | Trellis Netting | Velcro Ties |
Note: Again, all of these items can probably be found locally for much less money. If money is a concern, go hunting for them at Wal-Mart or Home Depot.
Bamboo Stakes
These stakes shown are 4′ tall, and are very strong. You can count on using them for several years at least. If you live in a windy area, or grow very large pepper plants, you can place one of these stakes near the pepper when transplanting, then use the velcro tape to secure it.
If you had taller stakes, you could also use them to stake tomato plants. Also, they are an option if you want to stake zucchini, which saves a tremendous amount of space. You could also use long wooden stakes, or even rebar.
Trellis netting
You can see my trellises here–I find I need to replace the netting every 2-3 years, depending on how careful I am when I remove the plants. I have used these trellises to grow tomatoes, cucumbers, and peas. I used to buy them from the Square Foot Gardening foundation, but they are not currently available.
Velcro tape
My husband discovered this, and we use it everywhere! In the garden I use it to help support my plants, and attach them to a stake or trellis. It’s soft so it won’t cut the stems, and it’s so easy to tear a piece off and use it.
5. Set out grids and irrigation
You may not want to actually turn on the irrigation yet–I suggest waiting until there is no risk of freezing the pipes (about 3 weeks before the frost date, which is the same time you plant lettuce or potatoes). But set out your grids and irrigation now, otherwise you’ll end up trying to put them over and around plants that are already growing.
If you need to purchase new grids, go to the official Square Foot Gardening Website.
6. Buy seeds
Unless you have a very large garden or plan to grow a lot of one vegetable, I find I rarely need to purchase more than one or two seed packets per plant, and often I have extra to store for the next year.
These are the brand I purchase, because they are made to do well in my area. I really suggest finding a local source for seeds.
7. A few essentials
If you don’t already have one, you need a trowel or transplanter. The transplanter is a little more narrow, which is great for digging smaller holes for young plants. I also have this kneeling pad on my wish list–it would save me from getting bruises as I kneel on the gravel!
| Tool Set | Kneeling Pad |
With these supplies in hand and these tasks complete, you are ready for planting and transplanting your garden!


Thank you for this blog post! I have been trying to regain my green thumb for some time now and I hoping I will be able to use some of your recommendations to get my garden back up and running.
Keenan
This will be my third season of my box garden. I have planted not only a summer garden but a fall garden also. I have yet to add or change my original dirt mixture and no fertilizers or additives. Yep, 100% organic. Trust me when i say that this system works even in the hot and humid deep south. This system is easy to manage, fun for the family, and it will produce not only quality of produce, but quanity. Thanks Mel for sharing your great ideas. Not only have I learned a lot, but my young sons have too. Bottom line, the box garden nearly takes all the guess work out of it. Its nearly a guarentee for results that you can eat.
It’s hard to make recommendations, because each area struggles with different critters.
Blueberries usually grow well in cool, damp conditions (think northeast) in an acidic soil that drains really well. Check your local extension office for suggestions about growing them in your area. There may be varieties adapted to your climate. In general, grow them in straight peat moss, or peat moss mixed with bark. They need cool temps, so be sure to provide some shade. Here’s an article that might help.
Some good, decomposed organic material (compost) is a must, and fertilizer is a bonus. Other than that, it would depend on your soil. If it’s getting waterlogged, I’d add some vermiculite. If it’s too dry, I’d add peat moss.
Is there a suggested supplement that can be added?
What would you suggest adding to Mel’s mix that would help grow blueberries in Texas?
Wow! Thanks for all the great information. I haven’t had much luck with my gardening but I think some of your tips will help out a lot. I can’t wait to read more of our blog. I hope I’ll be able to plant something for the fall garden.