
Building a Square Foot Garden Box (Wood)

This spring my friend Tara and I tackled this project together. Here’s a list of materials and costs:
- wood (two 16′ 2×10 boards, one 8′ 2×10 board-$31 total)
- 16 corner brackets ($.56 each, $9)
- wood stain (1 can from the “oops” pile-$5)
- screws ($5)
- miscellaneous parts ($3)
- weed mat (free)
- kite string (free)
- 1 bale peat moss ($8)
- 1 bag perlite ($13)
- 3 bags chicken compost ($11)
- 11 bags steer compost ($15)
- 6 gallon bucket of coffee grounds (free)
Total Cost: $100
Tools and equipment:
- electric drill
- scissors
- shovel
- gloves
- paintbrush

First, of course, we made a plan. We visited the site and decided where to put the boxes and how big they should be. Since we were building against a fence, we made them only two feet deep (as far as it’s comfortable to reach). One box was 7′, the other 9′. Then we made a shopping list, and it was off to Home Depot and Wal-Mart.

We made a bit of a mistake at HD-we allowed the store employee to pick our boards for us (they were heavy!). But they turned out to be bent and warped. This was a pain later on. Take the time to select really flat, straight wood. Look for splits and knots. It seemed that it was easier to get shorter boards that were straight–the 16 footers all seemed problematic.
Since we knew the exact lengths we needed, we had the HD employee to cut the wood right there. We had him cut the two 16′ boards into 9′ and 7′, and the 8′ board into 2′ sections (four of them).

We lay the boards on a flat surface (patio) and screwed the corner brackets on the insides. At first we drilled pilot holes, but soon decided it was not necessary. We used two brackets per corner, and secured one in each corner, squared it up, then screwed in the rest.

Upon the advice of the guy at HD, we bought stain and stained the boxes. We were lucky to get a cheap can of stain in the “oops” pile, but in the end we really liked the color. We propped it up so we could get the sides, bottom, and top.
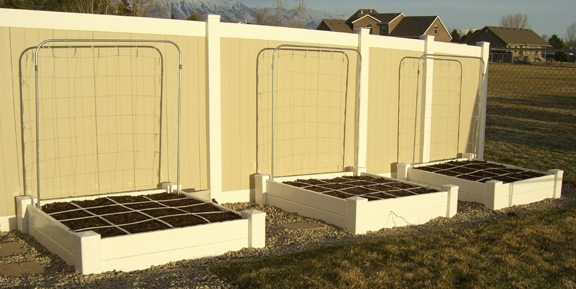
One of us stained, while the other prepped the area. We had to pull some weeds, plants, and move a sprinkler head. Then we lay down the weed mat, and put our boxes in place.
![]()
Instead of combining the Mel’s Mix on a tarp, we just mixed it in the box. This was much easier than with vinyl boxes because the wood is sturdier and won’t pop apart. We started with a layer of compost (some chicken, some steer) then added peat moss and mixed it up. We found it necessary to use our hands because the peat tends to clump otherwise. Then we added perlite (a cheaper option than vermiculite), mixed again, and then more compost on the top, along with the coffee grounds.

Finally, we drilled screws into the tops at 12″ intervals to divide the gardens into squares. We used kite string–it is made of nylon but it’s strong and thin. I tied on the ends, but just wound around the screws in the middle. If you look close you can see how I did it:
2—-3 6—-7
1 4—-5 8
Voila! Square foot gardens for $100 in 6 hours!
Happy gardening!


I just want to pipe in my two cents in case anyone reads these comments lol. I just put in some raised beds this year using prebuilt boxes from my local recycling center. They cost me $1.50 each for a 3.5 X 4 foot box that are about 2 feet tall made of pine boards! They were kinda a pain to pick up since I had to get a friend with a truck to transport them for me, but for some huge boxes premade it was worth it. The recycling center just grinds them into mulch. They had bottoms on them, just boards nailed in. we flipped em over and knocked out the bottoms with a hammer. I am going to treat them like they are 2′ X 3′ beds for SFG. I’m implementing companion planting so in just one square there may be 1 plant and like 6 herb plants lol.
I’m not an expert on “traditional” gardening, but I know that fresh manure will kill plants. So putting it on in the fall and letting it sit all winter, then tilling it in early spring will be your best bet.
I have a 12′ x 12′ area of backyard (with grass) that I’d like to garden, but I’ve never gardened before. I’m looking for the most economical way to get started, so I don’t think that building beds will work due to cost of lumber and adding so much soil. My soil seems to be good; I have done a lot of flower gardening and it’s easy to work with and everything has grown well. I have access to a rototiller and horse manure. Would I be able to just till up the top of the soil, grass and all, and then mix in the manure (and maybe some purchased topsoil) and plant in that? If so, how much manure should I mix in? And, should I prepare the soil this way in the fall, or wait until spring, a few weeks before I would plant? (I’m in Kentucky). Thank you so much!
Craig and Emily,
Just a suggestion–check out Pat Lanza’s -Lasagna Gardening.- I like the combination of Pat’s lasagna soil combined with Mel’s Square Foot bed method.
Pat recommends using thick (at least 1/4″), damp newspaper layers to block out the growth under her soil mix. She does not remove the grass. Most newspapers these days use soy-based ink (to facilitate recycling) and should be safe for garden use, but if you’re concerned, check with the newspaper’s publisher to be sure.
FYI, Fall is the best time to start the lasagna bed for spring use, so check out Pat’s low-cost alternatives to Mel’s Mix. She recommends scavenging as much as you can and tells you where to look for it. Her book can be purchased on Amazon, or you can find numerous websites with the information, including her original article in -Mother Earth News- magazine on line.
A note on plywood (I do realize this is a little late for the summer growing season, LOL, but maybe it will help out someone else next season): as the name implies, this item is a composite of several layers of wood. It is held together by glue. Unless you know this glue is safe to eat, I do not recommend using it with one’s edible garden. I don’t see any problem with the plant roots growing down to natural soil. If the soil is dense and has little nutrient content, the roots won’t go very far in it due to lack of interest (all the good food is higher up and takes less work to access–the plants will develop more roots in that area instead). On the other hand, if the native soil is full of fertile goodness, it can only benefit the plants when they find it.
One last note…on “building” raised beds: if you are intent on leaving the plywood attached, you can always set the frame on some bricks or cinder blocks to raise it above the level of the earth. Just be sure to put a couple near the center to support this structurally weak area…but be careful not to block the drainage holes (1 per square foot plus corners should be fine—just be sure to put landscaping cloth or screen over them to keep the soil from escaping every time you water). Setting plywood directly on the ground will cause it to deteriorate more quickly (and leach its chemicals into your food) than if it is raised (thus allowing air circulation to dry it out on the bottom). Also, raising the bed will allow you the option of leveling it.
Good luck all, and happy gardening!
Love your website, Emily! Keep up the good work!
Phil–I can’t find anything specific about this. I suggest calling your local extension. Good luck!
Craig–you can put it directly down, but you may not get every advantage. First, if your garden is on prepared soil, it’s possible for the plants to grow down deeper than the Mel’s mix to the soil below. Second, your drainage may not be sufficient, depending on the slope and how well the soil beneath it drains. Finally, I really think you want to remove the grass–it’s going to grow through the drainage holes and make you crazy. So minimally, avoid the grass (or kill it), and leave the bottom.
If have a 4×4 square foot garden with a plywood bottom and it has 1/4″ drainage holes 1 in every square plus 1 hole in each corner… would I be able to put the box directly on the grass? Or would that not provide enough drainage and I should remove the plywood? (I’d rather leave it on if possible, and I don’t want to create a “stand” to raise it off the ground.)
Recently work on some trees and have enough thick limbs to build a bed 10″ deep. Any reason not to use logs? They are TX Ash.
Kirsten–the books says not to use PRESSURE TREATED WOOD, but I was never clear about painting/staining the wood. The guy at Home Depot said the boxes will weather quickly without some protection. You could at least treat the outside, or treat the inside and add some layer between the box and soil (cardboard, plastic, etc.). But in my research even about pressure treated wood, it’s less than 1/4 inch of soil right next to the box that is affected, which seemed fairly minimal to me. The real question is–would the paint/stain leach into the soil?
Hi Emily,
My husband wants me to think about protecting the wood and here I see you stain your wood. I thought in the SFG book he said not to use treated wood because of the chemicals getting into the soil. Does stain do anything to the soil?
~Kristen
Hi Emily,
I just came across your site, and it has been really helpful! My wife and I started our first garden last year. We’ve put plywood bottoms on our boxes this year. Do you know what kind of holes I need to drill into the bottom of the boxes to allow for drainage? Thanks for your help!
Adam
I’ve perused a few articles from your blog and I’d like to say thank you. I like your style and I subscribed to your rss feed. You do update your rss right?
Teresa,
I did a quick google search and found these articles: http://www.gardeningblog.net/2009/04/12/using-pressure-treated-lumber-in-raised-garden-beds/
We built our boxes had the soil ready to go last fall and never got plants into it. We are ready to place plants into our small plot and I just saw on yours and another website that pressure treated is not good. What shoudl I do? I so wanting to get the plants in especially after we bought and put it all together. Is there a way to prevent any contamination, if there is any? It now has weathered since last fall. Thank you so much. I was planning on planting this week.
Unfortunately, I don’t have any follow up pictures. My main suggestions are to check out the plant spacing and companion planting information as you decide where to put things.
I had great luck just using a heavy cardboard box on a no-dig bed I put in last year. Laid down the cardboard right on the lawn (which was a mixture of grass and weeds), used boards for an edge, put in about 2″ of compost from an old leaf bin, and planted. I had to pull back the mulch/compost and cut holes in the cardboard to plant the tomatoes, but it worked great. Nothing grew through, the cardboard decomposed and this year I turned the soil on the whole bed. The only grass I got came under the edges, and a raised bed would probably solve that. I don’t think newspaper by itself would be a thick enough barrier, but the cardboard was from an appliance box and worked fine.
Hello,
I’m a first time gardener…I’m planning a couple of boxes just like these sice they are going right against my fence. Do you have any tips, recommendations and/or pictures on this particular garden. I’m really curious to know what you planted and how it all turned out. I would love to plant, Roma tomatoes, Serrano peppers, cucumbers, onions, watermelon, green beans, strawberries, herbs… Thank you!!
I had grass in the area where I put my garden beds. I dug up the grass, put down weed mat, and then set my gardens on top. It’s true that my roots don’t go down to the actual dirt, but since I have 12″ of soil I don’t worry about that. And amazingly, I have tons of earthworms. How they get in and why they don’t freeze, I don’t know. But every year I have more!
Another option is to just put down weed mat or newspaper and plop down your gardens. Theoretically, this will kill the grass by not giving it any sunlight. But grass is like a weed–it is very resilient and seems to grow where you don’t necessarily want it (around trees, between sidewalks, etc.). If you want to do less work and you’re willing to risk grass growing in your garden, this is what I would do. If the grass is a big problem you can always take up the beds and dig it out next year.
I am a first -time gardener about to build my garden. About “prepping the area,” it looked like this was installed in an area that was already a garden and not grass. To put a garden over lawn, do I need to take up the grass first? If so, is any additional prep required? Or can I just lay down some newspaper as a barrier over the grass and put the garden on top of it? Which makes me wonder if plants will be able to grow more than 8″ deep, or if they even do grow that deep.
Thanks for the great site!
Hello,
I’m a first time gardener…I’m planning a couple of boxes just like these sice they are going right against my fence. Do you have any tips, recommendations and/or pictures on this particular garden. I’m really curious to know what you planted and how it all turned out. I would love to plant, Roma tomatoes, Serrano peppers, cucumbers, onions, watermelon, green beans, strawberries, herbs… Thank you!!
It’s not a bad idea, unless you have a lot of wind that will stress your plants out. If you do, you’ll want to build some sort of a wind-break for your garden. I think traditional (plant in the dirt) gardens fare better on this. Raised garden beds, including square foot gardening, puts plants up higher and uses a soil that is less compact, so the plants are more likely to be negatively impacted by the wind.
But, for reference, I think I might live in the windiest place in Utah, and my garden grows just fine. 🙂
HI!
Where I plan to build my garden isn’t anywhere near a fence/wall. Is it bad to have a garden that is totally open to wind and the elements?
I love love love your site! I’m getting a group of my friends addicted to this stuff!! We love it!
Quick question? How did you get your kite string, and mesh matt for free?
I’m looking at building my own in the fall (as I’ve already started my own garden…and will be converting that garden space into grass space next year, and will be doing squarefoot gardening next season) if that makes any sense?
to keep it all a bit healthier, avoid pressure treated wood and petroleum stains. I saw in another site a recommendation to use Linseed Oil, to keep natural wood from rotting too quickly. It too just a few minutes to cover our 2×12’s and maybe we’ll get a few more years out of the wood. I’d also recommend using a naturally rot resistant wood, like cedar, but alas Home Depot (our closest wood dealer), isn’t a mecca for anything but plain or pressure treated – it’s all about the volume of sales, not the quality. And finding straight, small knot, unsplit wood at HD, can be a challenge too. Of course if money is no object they do have oak or poplar, but several dollars a foot didn’t fit our budget for wood laying in dirt.
Thanks, I bought wood and was stuck what to do next. Your timing was perfect. I didn’t think to stain them, but I bet that will help the wood last longer, love your oops color! Great job!
You can get lots of coffee grounds for free at local coffee shops. Sometimes StarBucks even packs them up in the bags the coffee came in. They are a natural source of nitrogen to fertilize your garden, and I love the way they smell!
So where do you get your coffee grounds? I heard this is really good for raspberries.
My husband just build me some great beds too. We made them out of Cherry rounds from Home Depot. Then we made a lap joint with the wood and then drove metal stakes into each connection. We stacked three high. I’ll have to get a picture of them and send you a picture just for anyone interested. The supplies were also very inexpensive. The wood was already stained so that is a bonus as well.
Hi,
Where did you get the coffee grounds, and what are they used for? I have never heard of that before. Thanks!
Hi
I just happened upon your site and want to share what I am doing. We started a family business of building the vinyl boxes and packaging just the right soil. We even set up and deliver! We provide some accessories as well. Check us out and spread the word! http://www.homegardenstogo.com